Average Reviews:

(More customer reviews)With the Granberg File-N-Jig 106B you can achieve the fastest possible cutting speed and, with good technique, have very good overall chain maintenance time. All the precision work can be done in the field. Also, you can set the up-down file angle so you can correctly sharpen square corner chain (semi-chisel) that cuts much faster than round corner chain.
How fast is the chain? You can always improve the speed of new chain significantly with the filing jig and good technique. You can maintain that speed through the life of the chain.
It is truly satisfying to always have a torrent of fat chips coming out of the back of the saw.
You might plan to spend an hour or two learning to use the jig. I include some tips that may help, but you will be the judge of whether much faster cutting chain is worth the investment in learning time.
Comparison
----------
I also have a Stihl FS-3 jig (I would rate this one star if it were sold on Amazon) and an Oregon 23736A jig (rated two stars, see my Amazon review). The Granberg 106B jig gives by far the best results.
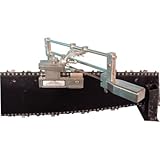
The strongest features of the Granberg 106B are its all-metal construction, a very stiff frame that resists distortion, symmetrically designed chain clamp screws, all adjustments are tool-free, and a really top quality indexed height dial. At 0.75 lb, it is the lightest and also the most compact of the three jigs I own.
I use the Granberg indexed height dial to precisely control both the file height (for hook) and the depth gauge height. I can see the index numbers clearly, even when rain is landing on the dial. Each full revolution is exactly 0.100" with marked and numbered subdivisions of 0.010", so the math is easy. By reading within the subdivisions, I can control height to about 0.002" accuracy and repeatability.
The Stihl jig has no index marks, so you are on your own to figure out file height. The Oregon jig has a very small red plastic dial that was hard to read when new and quickly became impossible to read due to normal wear and tear. The Oregon jig changes height by 0.108" for a full rotation and has twelve subdivisions of 0.009". I remember some time back working with the Oregon jig on dim Washington winter days; frequently with rain or snow falling on the dial; trying to read the tiny, worn-off, red-on-red numbers; and doing arithmetic in my head using divisions of 0.108" and subdivisions of 0.009"--not fun. I can read the Granberg dial under the same conditions, and I am just smart enough to do the math in my head with simple decimal divisions and subdivisions.
Complaints
----------
Amazon reviewer Bill B. complains that "the directions are just not clear" and "There are 3 or 4 important adjustments to be made each time you use the sharpener". (Even with these complaints, he does give it five stars.) A number of people on forestry forums have expressed similar complaints.
With the right technique, the adjustments are easy to make and will hold between filings; and the work will go quickly and smoothly.
Some tips
---------
Here are some tips, developed over many hundreds of filings, that I hope will help.
1. Start with good chain.
Start working with the jig on the best chain you have: either new chain or expertly ground chain is best.
2. Chain clamps ride on the rivet heads.
When set correctly, the chain clamps will ride securely on top of the chain rivet heads. Do not over tighten the thumb screw in the back.
If the chain clamps are properly set to ride on the top of the rivet heads, the jig will be secure. The clamps can be made to ride securely on 0.325" chain and even better on 3/8" chain because of the larger rivet heads. Adjust the two opposing clamp screws tight enough to prevent the cutters from rolling under the file motion and still loose enough to allow the chain to be advanced. When riding properly on the rivet heads, the front of the jig will not drop down due to filing activity.
The thumb screw has to be snugged just enough to keep the back of the jig from dropping down or the whole jig from kicking back when you are advancing and setting the chain or making the various jig adjustments.
If you tighten the thumb screw too much, the two sides of the jig will spread apart and the top will twist. You can feel this happen and see it occur if you look closely. The distortion of the jig will prevent you from achieving and keeping your adjustment settings. If the pivot point of the rotating head is not maintained in the middle of the chain, you will need to adjust the stop screw each time you change sides. You are also likely to not tighten the thumb screw the same amount when you start. Then you must adjust the settings again. (I believe this is the source of the complaint by reviewer Bill B. and many others.) I measured the Granberg jig to be about four times stiffer than the Oregon jig with its plastic filing frame--one of the major reasons for my low rating of the Oregon jig--but even with the Granberg jig you will want to take care to not distort the frame.
Make sure the jig is parallel to the bar. Especially do not let the back of the jig drop down or the curved heal of the chain back stop (the small floppy bent metal piece) may hang up on the cutters or depth gauges as the chain is advanced.
3. Centering the chain.
There is no specific adjustment for bar width, but assuming the thumb screw is not over tightened, which will lock in the chain position; you can use the two opposing chain screws to center the chain between the two sides by pushing a little harder on one side than the other. We want the pivot axis of the rotating head to be in the center of the chain.
First adjust the opposing clamp screws by eye to center the chain between the two sides. (I assume you are starting with expertly ground chain, so the cutters are pretty even at this point.) You can now set up the file stop screw to have the file just kissing the surface of one of the cutters on one side. Now change to the other side. If your file is not similarly kissing the cutter surface on the new side, try making up about half the error by pushing the chain sideways with the clamp screws: toward or away from the file. Make up the rest of the error with the file stop screw to move the file forward or backward. Now flip sides again and retest. Repeat as necessary until you have the same file contact for both sides. Now your chain is exactly centered under the pivot axis of the rotating file frame. You should only need to do this once for a particular type of chain and bar, although you might need to tweak one of the chain clamp screws a little from time to time.
I have been able to get the chain centered with chains ranging from 0.063" to 0.050" gauge, .325" to 3/8" pitch, and bar thicknesses ranging from about 0.160" to about 0.180".
4. Easy on, easy off with the jig.
You can take the jig off and put it back on without disturbing the chain clamp screw adjustments or the file height.
This is easiest if the chain clamps are set directly under one of the right cutters before removal or at the end of installation. This keeps the two small protrusions on the inside of the right side of the jig from hanging up on one of the right cutters.
The chain clamps should always be hanging on the tops of the rivet heads.
I put little springs on my chain clamp screws so they do not vibrate loose or get bumped out of position. See (12) below.
5. Adjust file height.
Adjust the file height screw to get the hook correct. This adjustment only needs to be reset about as often as the depth gauges are done--usually after a full day of work--to account for the slow lowering of the cutter height as the cutters wear back (due to the top plate slope of about 10 degrees).
To set the file height with accuracy and repeatability, I use the excellent Granberg indexed height dial. Raise the file and move one of the cutters as necessary to put the bottom of the file directly above the outside corner of one of the cutters (round corner chain) or the inside corner for square chain. I then move the cutter back against the stop and lower the file by about 85% of the file height (add about an additional 0.015" for square corner chain because you are using the inside corner). For 0.050" gauge, 3/8", square corner chain; I find 0.180" drop to be just right but dropping 0.185" gives too much hook. I cannot judge the difference of 0.005" by eye, but it makes a difference in performance, so I use the dial to get an accurate and repeatable setting. You will want to determine the exact height for your preference.
6. Filing into the stop.
You will not want to count strokes as with a file guide, but rather take as many strokes as you need until you feel the file lose its bite as the file frame stop bar (the rectangular bar) comes up against the file stop screw. It is easiest to stop as soon as you feel the file bite decrease. I think of this as feeling the "bottom". By always filing to the where you can feel the start of the bottom, long cutters will get more strokes and short ones fewer. The process equalizes the lengths automatically--generally to within about 0.005". Short cutters are low cutters because of the top plate slope and not do their fair share of work. Irregular cutter lengths lead to lost saw power and increased vibration, as also noted by Amazon reviewer Delfino.
When I start filing, I look carefully at the cutting surface of the first cutter, adjust the stop screw to file just a small depth, file until I start to feel the bottom, and then readjust...Read more›
Click Here to see more reviews about: Granberg Bar-Mount Chain Saw Sharpener, Model# G-106B

Click here for more information about Granberg Bar-Mount Chain Saw Sharpener, Model# G-106B
2 comments:
This Chainsaw Sharpener is an excellent tool for folks who are likely to work with a garage, studio, work shop, jobsite, or who are likely to do brief tasks with their chainsaw and will also be able to locate back in an electrical source after fabricated and operate with receiving their blades back in working condition.
https://www.bestconsumersreview.com/how-to-sharpen-a-chainsaw-chain/
The Chainsaw Sharpener is a superb tool for individuals which use chainsaws outside to receive a lengthy stretch of time. You'll be able to easily transport the unit in your travels and break easy realizing that you're going to be effective at get the cutters onto the chain sharpened fast, safely, and accurately...How To Sharpen a Chainsaw Chain
Post a Comment